
Every spring a familiar pest reemerges from its winter hibernation: the carpenter bee. While they don’t have stingers, these large, noisy, black and yellow insects wreak havoc on our houses, decks, and patio furniture, boring holes into the wood to make their nests.
The male bees then aggressively patrol the area surrounding their nest, which makes it difficult to sit out on a summer afternoon and enjoy the sunshine while they’re buzzing around our heads.
Carpenter bees are important pollinators, so you should leave them alone if you can. If the population at your house is getting out of control, however, you can build your own carpenter bee traps.
Read: A small city is devoting 1,000 acres of land to America’s vanishing bees
How to Make a Carpenter Bee Trap
Making your own carpenter bee trap is easier than you might think. Carpenter bees will use existing holes for nests if they can find them, so all you have to do to catch them is create a nesting site with holes yourself to attract them to where you want them to go.
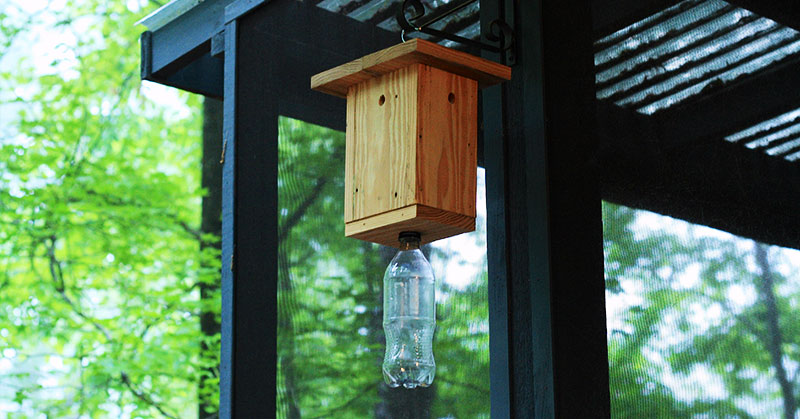
There are many designs out there, but they are all based on the same basic idea:
- Carpenter bee-sized, half-inch holes are drilled into a woodblock at an upward angle to prevent direct sunlight from shining in.
- A clear, tapered bottle is attached to a hole at the bottom of the box, providing an obvious exit for the bee once it enters the box.
- Once the bee enters the bottle, the tapered shape prevents them from escaping [1].
In order to make a carpenter bee trap, you will need the following materials:
- Circular saw (or a hand saw)
- Drill
- 1/2″ wood bit
- 7/8″ wood bit
- 1/2″ metal bit
- Square
- Punch
- Hammer
- Tape measure
- Screwdriver
- Pencil
- 4×4 post (A scrap of one is fine. You just need seven inches.)
- (1)Mason jar (half pint or a regular mouth pint)
- (1)Screw eye
- Wood screws [2]
You can follow step-by-step instructions on myfrugalhome.com or hgtv.com that will teach you how to make a carpenter bee trap, or check out this youtube video (see below) that provides easy instruction for how to make a trap using a plastic jug, as well as a more complicated version with wood, a mason jar, and honey.
What is a Carpenter Bee?
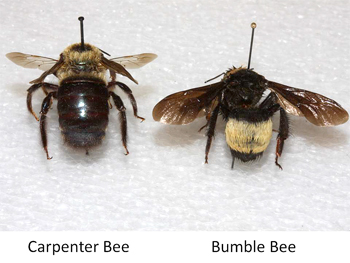
Carpenter bees often get mistaken for bumble bees, but you can tell the difference by their black, shiny tail section. It is given its name for its ability to excavate tunnels in wood with its strong jaw [3].
The female bees carve these holes into the wood to make a nest for their young. These holes, which are usually a half-inch in diameter and six to ten inches deep, are partitioned into several chambers. Each of these chambers contains an egg as well as a food supply in the form of pollen.
In some cases, several bees may use a common entry hole that connects to different tunnels, which can extend as far as ten feet into wood timbers [4].
A Path of Destruction
As mentioned, carpenter bees create a lot of damage to wood structures, particularly the boards on a house, eaves and gables, ceilings, wood shingles, patios, decks, and wooden furniture. Initially, the damage caused by these bees is generally very minor, however over time as generations of bees enlarge existing galleries in wood, significant structural damage can occur [5].
A tell-tale sign that you have carpenter bees on your property is the coarse sawdust that can be found beneath the hole. Wood painted with polyurethane or oil-based paint are less-preferred over untreated wood, but even they are not completely immune from a carpenter bee [3].
Pest Management Methods
Prevention is typically the best method for managing the carpenter bee population around your home. Whenever possible, you should construct exterior parts of a building out of hardwood, which are less susceptible to bee attacks.
Any depressions or cracks in wood surfaces should be filled so as to make those surfaces less attractive to the bees, and exposed surfaces should be painted or varnished regularly to reduce weathering and prevent attacks.
If you find any existing holes, you’ll have to fill them with steel wool or caulk, but this should be done after the bees have emerged. Once they are filled, paint or varnish the repaired surfaces [4].
If you are experiencing a large infestation or there is a significant risk of damage to structural integrity, then insecticides may be necessary. This, however, is not often an effective solution because since the bees are not actually eating the wood, and are active over the span of several weeks, they likely won’t be exposed to lethal doses of the insecticide. Additionally, since any exposed wood is at risk of being attacked, it is impractical and possibly unsafe to attempt to spray every possible area on and around your home [3].
It is very important to remember that carpenter bees are beneficial pollinators, so as much as possible you want to simply prevent them from nesting in the first place, and control their population, rather than exterminating them. Under most conditions, they can be successfully managed by filling in existing holes and maintaining your wood surfaces to make sure they are less attractive to carpenter bees [4].
Learn More About Carpenter Bees
Any time we are dealing with pests, prevention and management should be the first defence against infestation. As mentioned, carpenter bees are beneficial pollinators, so we want to do as little damage to their population as possible.
If you would like to learn more about carpenter bees and how to prevent them, click on the following links:
Carpenter Bees: Pests of Homes, Structures, People, and Pets
Carpenter Bees- Ohio State University
Keep Reading: Want to Help Bees? Leave the Dandelions Alone This Spring