
When you’re roughing it in the wilderness, it’s always good to have a few tricks up your sleeve. With a few cans of coke, you can create a single-burner stove yourself with these easy steps. Beyond camping, this technique could be very helpful in cases of emergencies or blackouts. You can use this stove indoors and outdoors to cook. It’s small and light, and easily transportable for backpackers.
Here is how you make one.
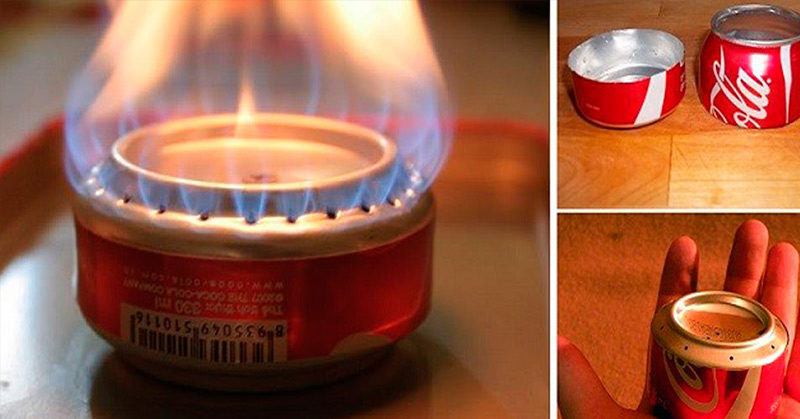
How to Build a Stove Out of a Can of Coke
You will need:
- 3 standard soda pop cans
- Denatured or rubbing alcohol for fuel
- Matches or lighter
- 1” x 1.5” x 5” swath of fiberglass insulation (optional)
- Heat resistant foil tape (optional)
Tools:
- Drill
- 1/8” & 1/16” drill bits
- Utility knife
- Scissors
- Straight edge Ruler
- Marking pen
Here’s what you do:
- Cut out the bottom of one can (keeping the thick rim intact) with the utility knife until it easily pops out.
- Drill 1/16-inch holes spaced evenly around the bottom ring of the can. This will create the burner. In the other can, drill one 1/8-inch hole as a drain for leftover fuel.
- Using scissors, cut around the edge of the can until it is one inch high all the way around with the cut part on top. This will make the top of the stove. On the second can, cut another one-inch base. This will make the bottom of the stove.
- On the top can cut slits up from the bottom around the whole can, stopping a 1/8 of an inch from the top. This piece can now be fitted inside the bottom can with some careful application.
Read: How To Make A Self-Feeding Fire – Lasts For A Whopping 14 Hours
- Carefully slide the top and bottom pieces temporarily together. Measure from top to bottom to find the width of the inner shield.
- Using a straight edge and utility knife, cut a strip from the third can to match the width measured in step 5.
- Place the stripe into the base of the stove to get the correct circular measurement. Then slice the opposite slits and join the ends together to form a ring. This will create the inner shield.
- Cut about three notches on the bottom of the strip. This will let fuel to flow into the outer ring.
- Place the inner shield in the base can. (Optional) Place the fiberglass in the space between the inner shield and the outer wall of the base.
- Slide the top half into the bottom half of the stove. Take care to fit the inner shield into the inner lip of the top and bottom halves of the stove.
- If there is an overhang from the bottom half of the stove, crimp the edges over with your fingers or a screwdriver. If you have it, you can use the heat resistant foil tape to cover the seams between the top and bottom halves of the stove to help prevent leaks. [1]
Read: The “Man Without Money” Has Thrived Without a Dollar to his Name for Over 15 Years
Tips on lighting the stove:
- Add 2 ounces of alcohol max to the center of the stove then light it.
- The stove lights quickly, so be careful. You won’t be able to see an alcohol flame in daylight. It will take about a minute for the alcohol to heat up and achieve an even burn out of the burner holes.
- To put out the flame: Cover the stove with a larger can to suffocate the flames.
- To cook: Support a pot of food or water with a metal stand about 1.5 inches to 2 inches over the burner.
- One ounce of fuel lasts a little longer than 5 minutes, just long enough to boil 12 ounces of water.
- Practice fire safety whether you are inside or outside. Keep fire extinguishers at the ready.
Why Does This Work
The aluminum can is a light metal, and its durability and flexibility make it a popular choice among manufacturers for everyday items. For this reason, it’s also ideal for this project, since it’s thin enough to slice through but sturdy enough to retain the shape and stay fire-safe. This also makes your homemade stove another way to reduce, reuse, and recycle. [2]
You can make this stove in advance and then pack it with your gear before a camping trip or hike, or just ready for emergencies. This burner is very light, compact, and frugal. Backpacking stoves in stores can cost around $40, while making it yourself can cost almost nothing, depending on how many of the supplies you already own.
Keep in mind that some national parks don’t allow stoves that use alcohol to burn since they don’t contain the built-in safety features of modern stoves. Check the regulations of the parks or camping sites before lighting up this DIY burner. Where it is allowed, this little cola can is a smart addition to your list of gear.
If you’d like easy printable instructions, click here.
Keep Reading: This Awesome Tent Cot Means No More Sleeping On The Cold, Hard Ground When Camping
[1] “Soda Can Stove.” Utah Gov. Be Ready Utah.
[2] “How To Build A Coke Can Stove For Hiking & Camping.” MMK. Architecture and Design. September 29, 2015