
Imagine if you could turn any water into drinking water, right in your own home. With this DIY solar still, your wish can actually come true. Keep reading to find out how you can make your own backyard solar still.
How To Make Your Own Solar Still
The sun is a powerful resource that humans have been using to their advantage for thousands of years. In fact, there is no shortage of ways you can use this powerful resource in many aspects of your home. A solar still is just one of the many ways that you can live cheaper and more sustainably. (1)
Thankfully, we’ve got just the book for you to make your home more sustainable. Get your copy here for more innovative and resourceful DIY ideas to harness the power of the sun and link to amazon with our code.
There are many reasons why you should start distilling water at home. This DIY solar still can make any water drinkable, including (1):
- Saltwater
- Lake or stream water
- Brackish, dirty water
Not only will it provide you with clean drinking water, but distilled water is beneficial for other purposes, as well. Some plants, such as orchids, are sensitive to the chemicals and minerals in tap water and thrive when given distilled. Your steam iron will last longer if you use distilled water, and so will your radiator when you mix distilled water with antifreeze. (1)
How A Solar Still Works
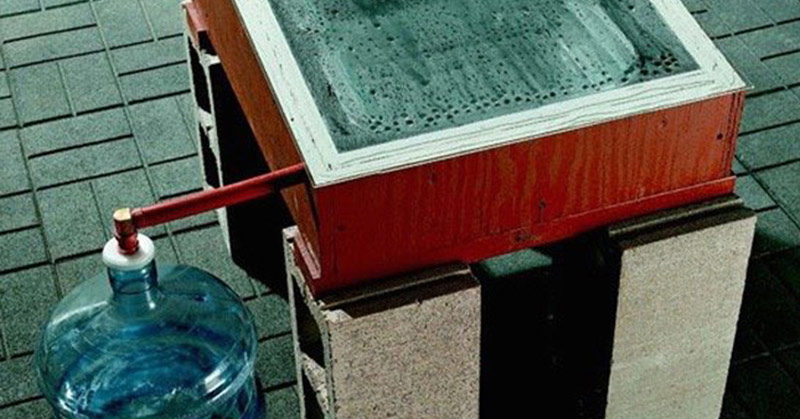
A solar still works the same way as an evaporation pond. The heat from the sun causes the water to evaporate, leaving behind just the minerals. A solar still, however, collects that evaporated water instead of allowing it to escape into the atmosphere. (1)
The hot, humid air rises up in the box until it reaches the cooler, slanted glass sheet at the top. The evaporated water then condenses into small droplets on the glass. These droplets roll down the glass into a collector tube that transfers them into a jug. (1)
What You Need
The box on Mother Earth News is made from (1):
- ¾’ BC-grade plywood
- Insulated back door
- A sheet of glass for the top
- 1” PEX tubing for the runoff tube
They used a double layer of plywood on the sides to prevent warping and also painted the inside black to promote more heat absorption. (1)
For a liner for the inside of the box, they suggest glass, stainless steel, or two or three coats of FDA-approved black silicone caulk. This is because metals corrode and plastic break down or off-gas, causing the water to taste bad. (1)
For their solar still, they chose to use two 10 x 15” glass baking pans that can hold up to eight quarts of water. These are easy to remove and clean, won’t warp, and won’t impart any taste on the finished product. (1)
Steps to Build Your Own Solar Still
For all the right tools and fine details, check out the list here.
From there you can follow these steps from Mother Earth News (1):
- Mark and cut the plywood pieces according to the cutting list. Cut the angled end pieces with a circular saw or table saw set to a 9-degree angle.
- Cut the insulation the same size as the plywood base, then screw both to the 2 x 4 supports with 2 1/2″ screws.
- Screw the first layer of front and side pieces to the base and to each other, then add the back piece. Predrill the screws with a countersink bit.
- Glue and screw the remaining front and side pieces on, using clamps to hold them together as you predrill and screw. Use 1 1/4″ screws to laminate the pieces together and 2″ screws to join the corners.
- Glue and screw the hinged door pieces together, aligning the bottom and side edges, then set the door in position and screw on the hinges. Add a pull or knob at the center.
- Paint the inside of the box with black high-temperature paint. Cover the back and the door with reflective foil glued with contact cement. Let the paint dry for several days so that all the solvents evaporate off.
- Apply weather seal around the edges of the hinged door to make the door airtight.
- Drill a hole for the PEX drain. The top of the PEX is 1/2″ down from the top edge. Clamp a scrap piece to the inside so the drill bit doesn’t splinter the wood when it goes through.
- Mark the first 19″ of PEX, then cut it in half with a utility knife. Score it lightly at first to establish the cut lines.
- Drill three 1/8″ holes in the side of the PEX for screws, then insert the PEX through the hole. Butt it tight against the other side, then screw it in place, sloping it about 1/4″.
- Wipe a thick bead of silicone caulk along the top edge of the PEX to seal it against the plywood.
- Shim the box level and tack a temporary stop to the top edge to make it easy to place the glass without smearing the caulk. Spread a generous bead of caulk on all the edges, then lay the glass in place. Tape it down around the edges with painter’s tape, then let it set up overnight.
Now you have your very own DIY solar still that will provide you with clean drinking water on a daily basis.
For more useful DIY solar projects to use the sun to power your home, save money, and protect the environment, get your copy of DIY Solar Projects: How to Put the Sun To Work In Your Home here.
Keep Reading: Window Box Solar Heater That Gives “Free Heat” All Winter & Doubles As A Solar Oven
Disclaimer: The Hearty Soul is a participant in the Amazon Services LLC Associates Program, an affiliate advertising program designed to provide a means for sites to earn advertising fees by advertising and linking to Amazon.com