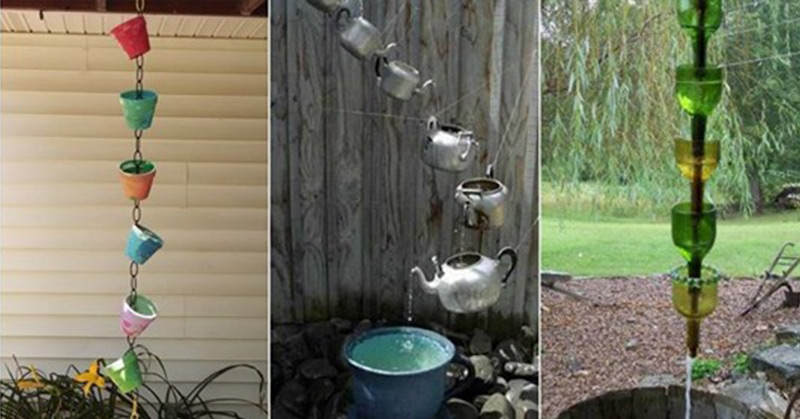
Looking for a fun new craft project to do that will spruce up your home’s rain spout and provide a soothing sound every time it rains? Your search ends here with the simple, customizable DIY rain chains.
DIY Rain Chains
A rain chain is a chain you make out of various types of items and materials that hangs from your gutter spout. When it rains, the water from the spout pours over the rain chain, making beautiful, natural music in the meantime. These rain chains will surely add a whimsical beauty to your home.
What You Need
To make your DIY rain chain, there are a few decisions you need to make and tools you need to gather. Options for types of rain chains you can make include:
- Copper
- Aluminum
- Scrap metal
- Plastic
- Glass
- Terra cotta
- Ceramic
- Porcelain
- Wood
- Sea shell
- Stones, rocks, and pebbles
In general, the tools you will need are as follows:
- Tape measure
- Socket wrench to remove the downspout
- Wire cutter
- Drill
- V-hook
- Gloves
- Metal file or sandpaper
- Nuts and bolts
- Wire and chain
- Step ladder
- Nick knacks to style your chain as desired
If you choose to make your chain using glass objects, you will need special drill bits specifically for glass, protective eyewear, and cut-resistant gloves.
Read: Tutorial: Build an amazing DIY pergola and fire pit with swings
Types of DIY Rain Chains
As already mentioned, you can create your rain chain out of a wide variety of materials and objects. Here’s a brief overview of each type:
- Copper
Copper is a durable metal, so should you choose this option your rain chain will last for a long time. Copper also oxidizes easily and in a very beautiful way. Check this chain or this one for a rain chain-succulent combo. - Aluminum
Aluminum is soft and malleable which makes it a very easy metal to work with. You will want to ensure you are using a heavier chain with your aluminum parts because this metal is very light and will be blown around by even a light breeze otherwise. Try this cookie-cutter rain chain or this cool aluminum ring version. - Scrap Metal
Using scrap metal to make your rain chain can give your chain an interesting, rustic effect. Though potentially harder to work with, the possibilities for style are truly endless when using scrap metal. Check out this one using tiny teapots, this one using old keys, or this one made of spoons. - Plastic
Though less durable and will fade if exposed to too much sun, plastic rain chains are a great way to upcycle old plastic objects. Try this one made of colorful plastic cups or this one made of old soda bottles. - Terra Cotta, Ceramic, and Porcelain
These can also add interesting colors and patterns to your rain chain, however, the material is easier to work with than glass. You will want to ensure your porcelain is painted and has sealant on it, however, otherwise they will absorb too much water. Some fun ideas are this broken clay pot chain or this mosaic tile chain. - Wood
Different types of wood can make for a very visually appealing rain chain, not to mention the different sounds each piece will make when the rain hits it. You may wish to paint or stain your wood to prevent it from becoming slimy over time. Try this driftwood and stone version if you live near the beach. - Sea Shell
Another brilliant option if you live near the beach or want to create a fun souvenir out of shells from your more recent vacation. Just like glass, make sure you wear protective eyewear and gloves when working with shells. Check out this snail shell version or this seashell rain chain. - Stones, Rocks, and Pebbles
Using unique ways to secure them with wire, stones, rocks, and pebbles can add variety to your rain chain with all of their different colors, shapes, and sizes. Again, safety gear is key when working with such hard materials. Try this wire-wrapped stone chain.
Hanging Your Rain Chain
Now that your chain is built, all you have to do is hang it up and enjoy! Follow this tutorial for how to safely and securely hang your chain from your old rain gutter.
Looking for some more inspiration? Check this video out!
Keep Reading: How to Make A DIY Rustic Live Edge Countertop

