
Are you wanting to update the floors in your home in a beautiful but inexpensive way? This DIY penny floor just might be the design that you need. Not only is it absolutely stunning, but it only costs, well, pennies!
DIY Mosaic Penny Floor
Kat Von D posted on Facebook about her penny floor room. When Kelly Graham, owner of the Etsy shop Camias Jewelry Designs, saw how much interest the post was attracting, she thought “hmmm… maybe I should share my own penny floor with my followers”.
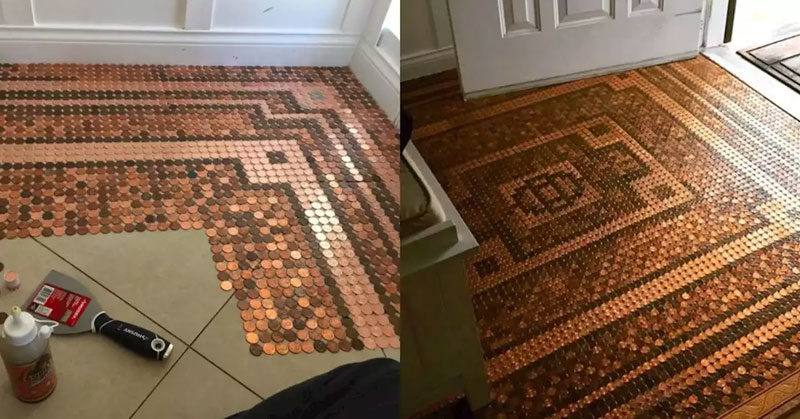
Back in 2015, Kelly decided the floor in her entrance hall needed an update. An avid DIY-er already, she had the idea to cover her boring laminate floor with a beautiful mosaic made of pennies. (1)
The Process
She went to the bank and bought rolls of pennies – 7,500 pennies, to be exact. Over the course of about three weeks, she sorted all of the pennies and came up with her design. She then laid each penny in position on the six square-foot space before gluing them all down. She finished off the project by grouting the floor and covering it in a clear resin coating. Five years later, the penny floor looks as gorgeous as ever. (1)
“I’ve got a few kids and it still looks in top shape,” she says. (1)
Read: How to Make A DIY Rustic Live Edge Countertop
How To DIY Your Own Penny Floor
If you’re feeling inspired by Kelly’s penny mosaic and want to make your own, we’ve got some simple steps for you courtesy of Epoxycraft.com.
Materials
- West System G/5 Five-minute adhesive
- Disposable brush
- Foam roller cover
- 2 measuring bowls
- 1 smooth-walled mixing container
- Long spatulas
- Electric paint stripper
- Appropriate sealant
Instructions
- Test Run
Read through all of these steps and do a trial run on a small patch of flooring that isn’t super visible. You might have to do a couple of practice runs before you feel ready to do the whole floor. - Get Your Pennies
Even for a small area you will need a few thousand pennies. Measure your floor and order your pennies in advance. If you get part way and think you won’t have enough, you can always order more. - Ensure a Level Floor
Make sure you sand away and bumps or lumps and fill in any holes. If you’re floor is really problematic you may need to put down plywood and paint it. Floor or plywood – sand and clean the floor before you begin. - Stick Your Pennies Down
Lay down your pennies and glue, glue, glue! - Finishing Coat
Now it’s time to pour the epoxy all over the floor. Choose one that is solvent-free and durable and won’t affect the finished look of your floor. Wessex Permakote is a great option for this, as it will fill in the gaps so you don’t need to use a grout with. - Let it Sit
The epoxy finish will gel in 45-50 minutes and be completely hard to the touch in 6 hours. It will take about four days to reach it’s best quality and hardness.
For more info on DIY penny floors, go here.
A Floor Gone Viral
Since posting the before, during, and after photos of her penny floor, Kelly has had over 15,000 comments and 136,000 shares. The coins, which are all laid face up, have not discolored thanks to the grout and resin finish. The best part about this floor design? It only cost her $75. Now that’s an interior design price tag we can get behind. (1)
Keep Reading: How To Make Your Own DIY Rain Chain + Design Ideas To Get You Inspired
Sources
- https://www.housebeautiful.com/design-inspiration/a32407534/how-to-make-penny-floor/